Lights on! camera! Action!
Directors on large Hollywood film sets always give this instruction. But also in your bedroom you should follow this order as a cam girl or cam boy. Let’s just have a closer look at the first part “Lights on!”. We will tell you how to get the right lighting for webcam shows.
WebCam Show Lighting
The decision with which cam girl or cam boy the customer will go in private or pay tips for is up to him. But ask yourself the question, who would you choose? A cam model that broadcasts in poor quality or one with a high quality, crystal clear stream? The decision should be easy for you, at least it is for the viewer. If they’re already spending money, they want to get something for it. In our article The Best Web Cams for Cam Girls and Cam Boys, we will tell you which webcams you can use to stream crisp videos.
The right lighting is not only important for webcam shows
Illuminate correctly. knew how:
The right lighting envelops you in a pleasant light. You shouldn’t be under- or overexposed. With a play of shadows and depth, your picture will look natural and you will look more real. You shouldn’t forget that most webcam customers fulfill their fantasies with paid webcam shows. In their heads, the images are razor-sharp and not underexposed, blurry or out of focus. Be the cam girl or the cam boy from their fantasies: sharp to look at. And by that we mean (also) the image quality. When you do that, you will notice that the lengths of your shows will increase. As a result, the initial investment costs are quickly amortized and your sales shine in a completely different, namely well-lit light
Here we provide information that could help you to achieve optimal lighting or illumination. We also show you where you can get inexpensive material and briefly discuss the 3-point exposure system, which is the basis for film and photography.
Low-Budget Alternatives
startnow.cam-Tip: If you don’t want to buy a diffuser paper, you can direct the light against a white wall or ceiling. White baking paper or butter paper are equally suitable.
The right lighting for webcam shows – Three point lighting guide


1. Key Light
This is your main light or your primary light source. It is the light that is the brightest. Place your key light next to the camera at a 45 ° angle. It should be installed so that the light hits you from diagonally above. This ensures a natural appearance, because this comes closest to a natural light source, the sun. The webcam should be at eye level.
2. FIll Light
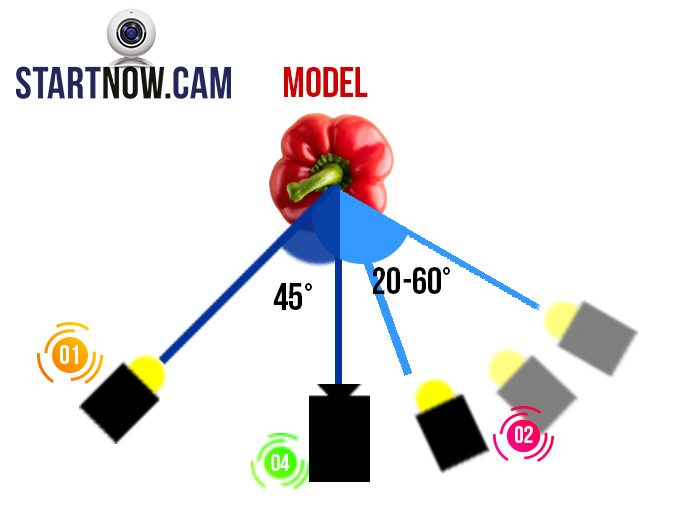

3. Back light
The back light stands opposite your fill light and ensures that you get more depth in your pictures. This makes you stand out more from the background and your viewers really perceive what is important: you!
We hope that we can help you with the instructions for installing a 3-point lighting. You can see that it is actually not that difficult to set up professional lighting. The effect achieved with this turns your baaah streams into true haaa streams! As a beginner, you often forget to think about adequate lighting. Indeed this is an elementary part of the whole thing! Whether our proposed variant with do-it-yourself elements or more professional solutions that can be bought depends on your budget. However, you should not save on your webcam or lighting equipment so that you can offer a high quality product. With the 3-point lighting described above, chances are good that you will succeed!
Neewer LED-Softbox-Lighting Set

Exo Terra Porcelain Clamp Lamp

Neewer Diffusor-Fabric


